Overview
Secure Web Pay (SWP) makes it easy and convenient for customers to make payments online, while giving organizations a secure and reliable way to manage transactions. With a simple, user-friendly payment experience, SWP helps reduce the effort required to process payments, supports multiple payment methods, and can help organizations simplify their security and compliance responsibilities. Once the service is activated, merchants can self-serve and customize the following features to create the payment experience that best fits their organization and customer.
- Edit company information
- Adjust style
- Modify billing information
- Set shipping information
- Change order/payment information
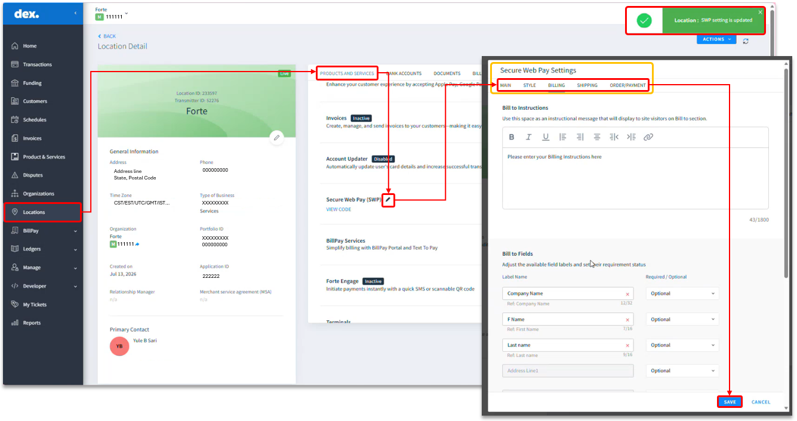
To make these adjustments, log in to Dex and select “Locations” in the left pane. Then, select “Products and Services” and click the pencil icon next to “Secure Web Pay (SWP)” to open the settings. From there, follow the steps outlined in the sections below.
Once the changes are saved, a success message appears in the top-right corner of the screen, confirming that the updates were saved successfully.
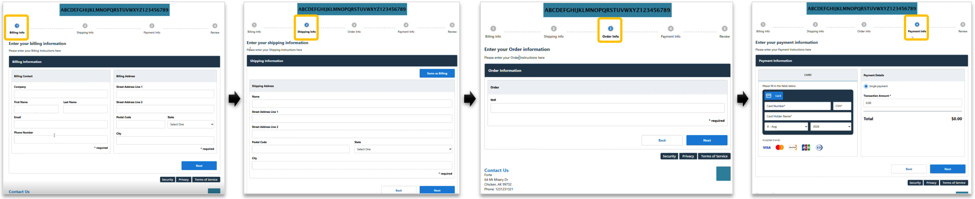
Please note that the portal includes five steps associated with these settings: “Billing Information”, “Shipping Information”, “Order Info”, “Payment Info”, and “Review”. Users can navigate between the steps using the “Next” and “Back” buttons at the bottom of each step.
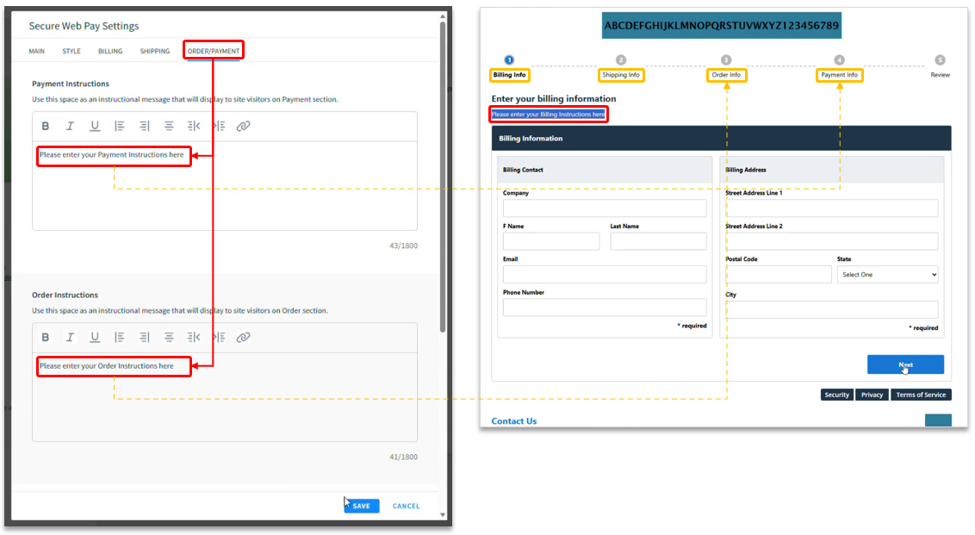
Each of these steps includes an instructions field associated, which merchants are encouraged to complete to provide additional guidance and create a better user experience.
Section 1: Edit Company Information |
|
|
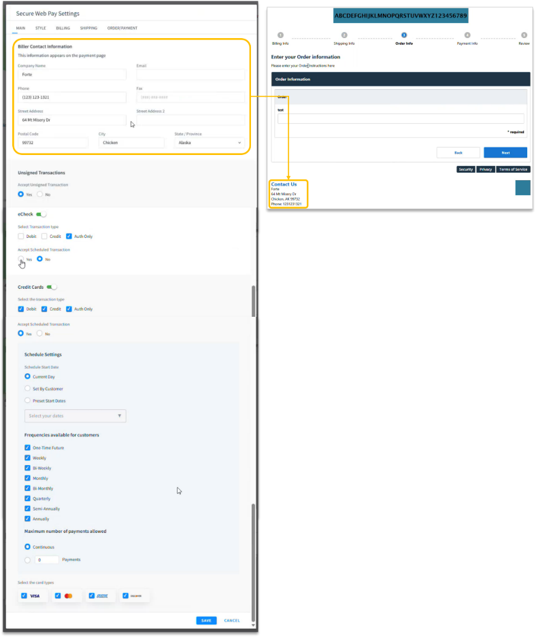
To edit the company information, go to the “Main” tab:
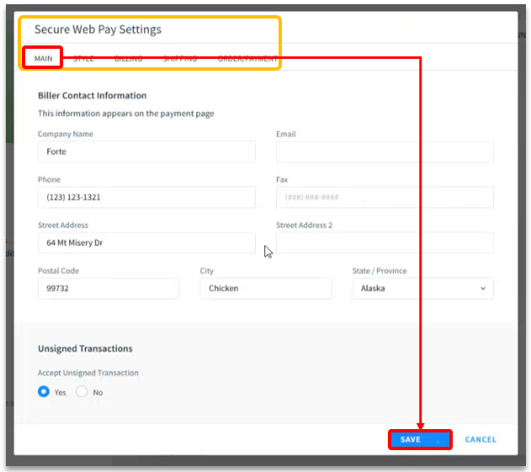
From there, merchants can update the company details displayed in the portal footer, select the transaction type, and configure scheduled transactions and other settings, such as the transaction frequency and whether to accept unsigned transactions. For example:
Important Considerations:
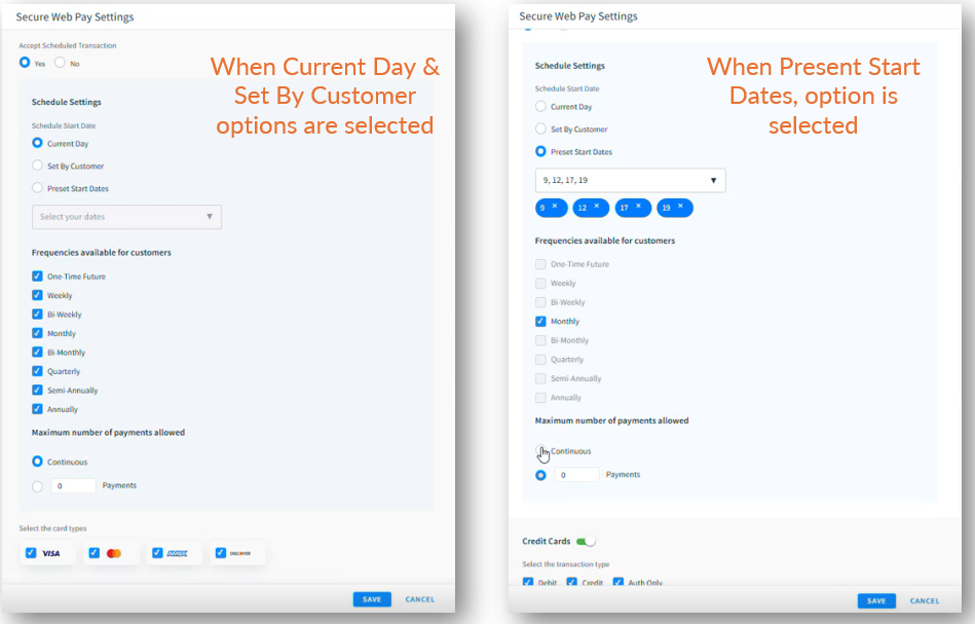
| Payment Methods | Select only payment methods that are enabled for your merchant account (already active, not intended for active use). Select only card brands supported by your processing configuration. |
| Recurring Payments | If recurring payments are enabled, determine whether customers should:
|
| Preset Start Dates | When using this dates:
|
| Maximum Payment Occurrences | Choose whether recurring payments should:
|
Section 2: Adjust Style |
|
|
To customize the platform, go to the “Style” tab:
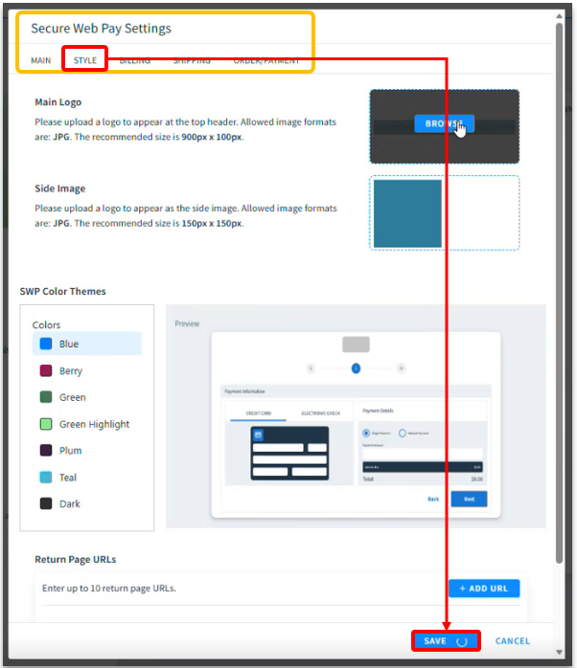
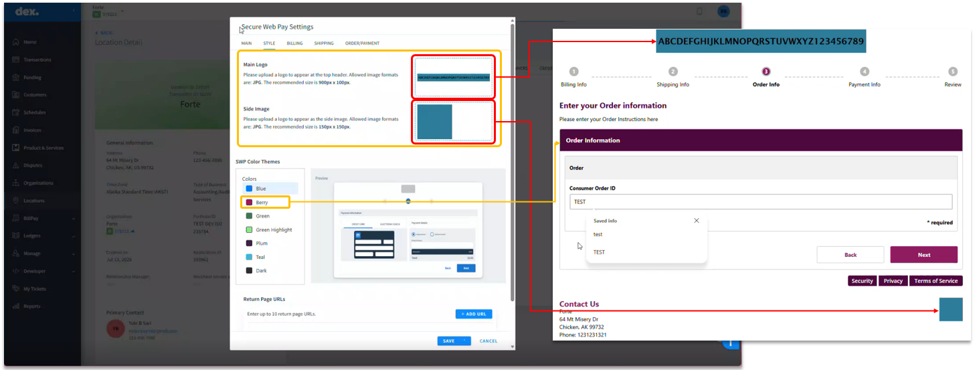
From there, merchants can upload their company logo for display at the top of the portal and in the footer (merchants should review the requirements in the instructional text, including the accepted .jpg format and image size in pixels). They can also select the theme color and add up to 10 return page URLs. For example:
Section 3: Modify Billing Information |
|
|
To set the Bill To information, go to the “Billing” tab:
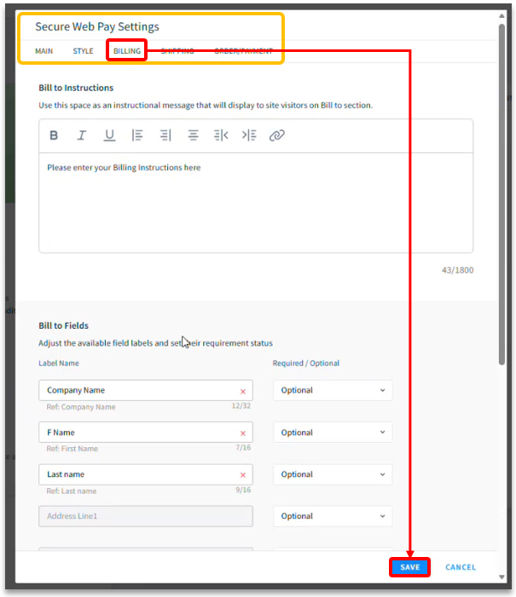
From there, merchants can customize the field labels and specify whether each field is required, optional, or hidden. Merchants should review the instructional text for the available character limit. Please note that the “First Name” and “Last Name” Bill To Fields cannot be hidden, just marked as required or optional.
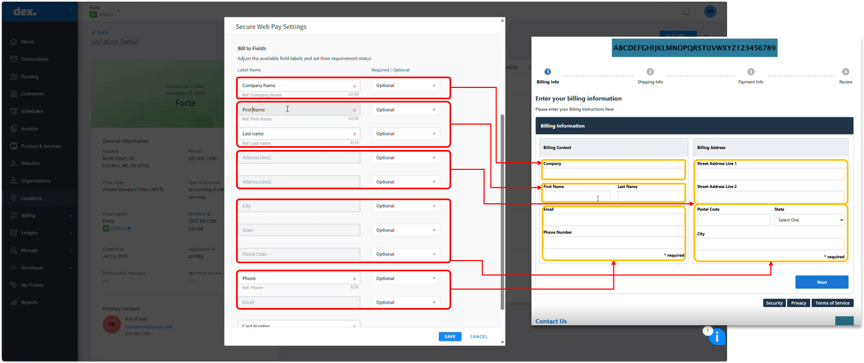
These fields include Company Name, First Name, Last Name, Address Line 1, Address Line 2, City, State, Postal Code, Phone, Email, Card Number, and Transaction Amount. Please note that the last two cannot be adjusted as optional or hidden. For example:
Section 4: Set Shipping Information |
|
|
To set the Ship To information, go to the “Shipping” tab:
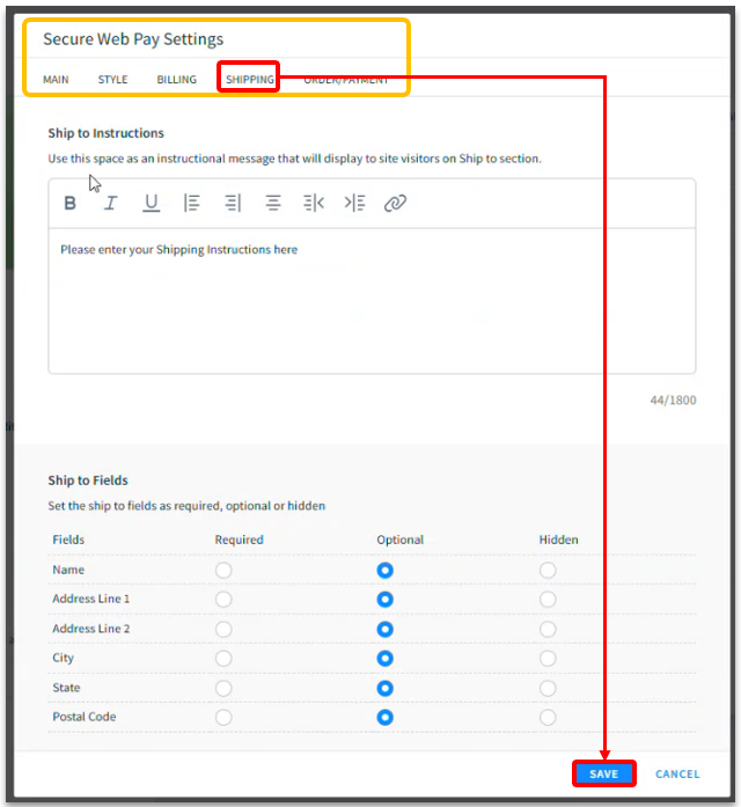
From there, merchants can set the fields as required, optional, or hidden. These fields include Company Name, First Name, Last Name, Address Line 1, Address Line 2, City, State, Postal Code, Phone, Email, Card Number, and Transaction Amount. Please note that the last two cannot be adjusted as optional or hidden.
Section 5: Change Order/Payment Information |
|
|
To edit the order information, go to the “Order/Payment” tab:
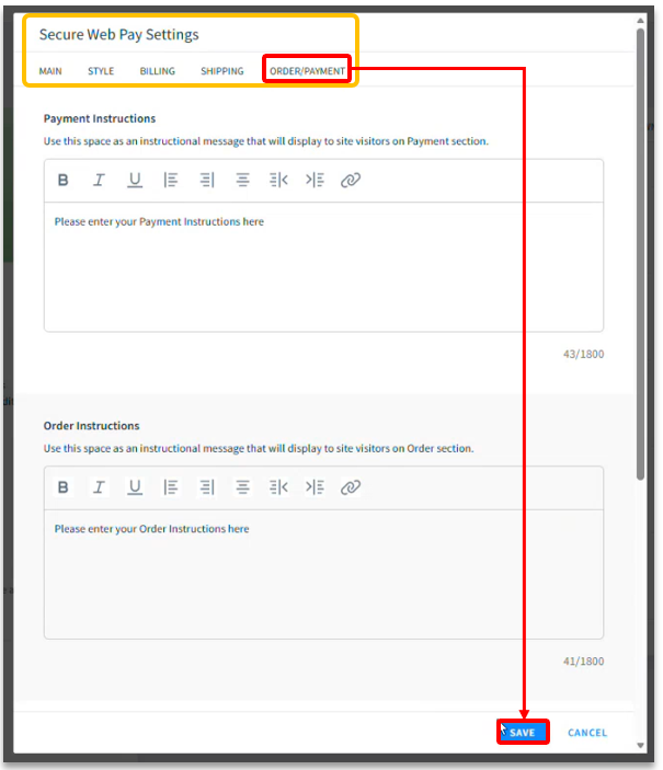
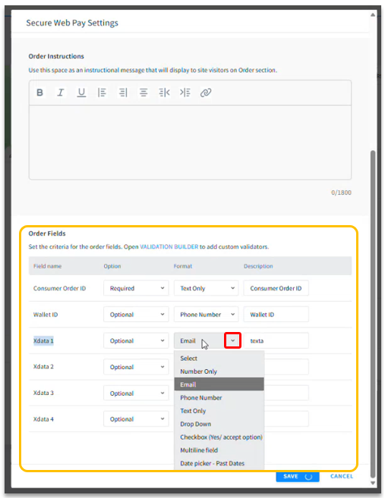
From there, merchants can configure the Order Fields, including “Consumer Order ID”, “Wallet ID”, and four additional data fields. Each field can be set as optional, required, or hidden, and merchants can select the desired field format, such as:
- Number Only
- Phone Number
- Text Only
- Dropdown
- Checkbox
- Date Picker
An open label field for “Description” is also available for each field to provide a description or additional instructions.
Important Considerations:
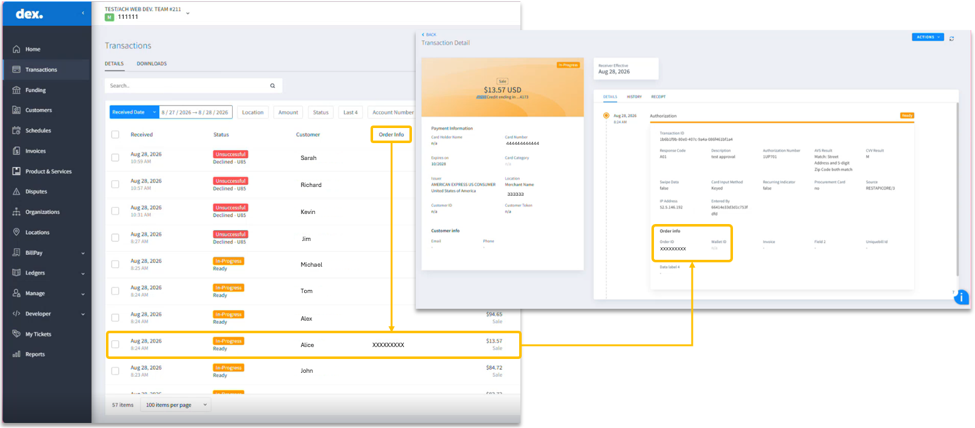
- A description is important for each field because, without one, the label will not appear in the form, which may make the dropdown difficult for customers to understand. It is also important to configure a “Consumer Order ID”, as it helps merchants identify and associate a payment with the corresponding order or transaction in the backend; for example, can help identify a specific insurance policy for an insurance company or a utility account number for a utility provider.
- Note: Use this field to capture a unique reference that helps merchants quickly identify and associate a payment with the corresponding transaction, account, policy, invoice, or customer record.
- Only in the receipt is “Consumer Order ID” and “Wallet ID”, other customer fields are not included .
Was this article helpful?
That’s Great!
Thank you for your feedback
Sorry! We couldn't be helpful
Thank you for your feedback
Feedback sent
We appreciate your effort and will try to fix the article