Questions
1. What is PGP encryption?
2. How are PGP keys used when sending or receiving files with CSG Forte?
3. What CSG Forte Public key is available for secure data transfers?
4. How to generate a PGP key pair using GPG4WIN?
5. How are the Private and Public keys exported in Kleopatra?
6. How to import a public key in Kleopatra?
7. How to encrypt information in Kleopatra?
8. How to decrypt information in Kleopatra?
1. What is PGP encryption? |
|
|
Pretty Good Privacy (PGP) is an encryption/decryption method used to protect sensitive files during transmission. PGP uses two related cryptographic keys that work together as a pair: a PGP Public Key and a PGP Private Key. The tool used to support this encryption process is Gpg4win, a free software package that provides GnuPG for Windows and supports file and email encryption.
• Public key: Used to encrypt a file before it is sent to a recipient.
• Private key (Passphrase): Used to decrypt the encrypted file after it is received by the recipient.
Only the recipient should have access to PGP Private Key and must never share it with anyone. It is recommended that these keys be used exclusively by authorized personnel.
2. How are PGP keys used when sending or receiving files with CSG Forte? |
The examples below illustrate how PGP encryption is typically used when exchanging files with CSG Forte. Customers, third parties, or service providers should identify the scenario that matches their file-transfer process and follow the corresponding steps to determine which party is responsible for providing the PGP Public Key and which party is responsible for decrypting the file.
Scenario 1: CSG Forte sends an encrypted file |
When CSG Forte needs to send an encrypted file, the recipient must provide CSG Forte with its PGP Public Key before the file can be sent. The PGP Public Key may be included in the submitted ticket, or the ticket may specify the repository or website where the key is available. a) The recipient generates a PGP key pair and shares its PGP Public Key with CSG Forte (refer to Question 4 and Question 5 for information on generating and exporting PGP keys). b) CSG Forte encrypts the file using the recipient’s PGP Public Key and sends the encrypted file to the recipient through an authorized channel such as an SFTP server. c) The recipient receives the encrypted file and uses its PGP Private Key to decrypt it. Example: A customer needs to receive settlement reports from CSG Forte in an encrypted format. The customer generates and provides its PGP Public Key to CSG Forte. CSG Forte encrypts the report using that PGP Public Key before sending it. Once received, the customer uses its PGP Private Key to decrypt and view the report. |
Scenario 2: CSG Forte receives an encrypted file |
When a customer, third party or service provider needs to send an encrypted file to CSG Forte, the sender must use the appropriate CSG Forte PGP Public Key to encrypt the file. a) CSG Forte provides its PGP Public Key to the encrypted file’s sender (refer to Question 3 to get the CSG Forte PGP Public Key for secure data transfers to encrypt the file). b) The sender encrypts the file using the applicable CSG Forte PGP Public Key and sends it to CSG Forte through an authorized channel such as an SFTP server. c) CSG Forte uses its PGP Private Key to decrypt and read the file. Example: A customer needs to securely transmit account or transaction data to CSG Forte. The customer obtains the appropriate CSG Forte PGP Public Key, encrypts the file using that key, and sends it to CSG Forte. Upon receipt, CSG Forte uses its PGP Private Key to decrypt and access the information. |
3. What CSG Forte Public key is available for secure data transfers? |
|
|
CSG Forte Third-Party File Transfer PGP Public Key is used to encrypt customer’s information, payment method, and token data and is the appropriate one to be used during data transfer processes. The public key is provided below.
• Public key: CSG Forte Third-Party File Transfer Public Key
-----BEGIN PGP PUBLIC KEY BLOCK-----
Version: GnuPG v2

mQENBFeFJm8BCACid+Cmu+e+zH/qNmpYGXbsA8HuqdkENXVSiSJoScDJp2zk4tjc eEnkw2M+wTyT+lTo+/lA5+V2/Z7lA/1zZ+YVBcomC800AVnxHNz3aUPx73BtqSKe YAkW5/1+ipANOnrBAZENJVXtdiL4w/Du2RgOwrAIwvqYDJe8fiA9H5yqe/OEANDj r0gkU9BNKAEGgT5DRkHcNcmgpmRsjmA7SGkJXmiAdKpwv6sAo5hejYwifTeGD1SR bT6X/1wHCnk0pce3A9OIZj2jESJq3ZoKoVex9ASiJ3MfJHFz2EEjQQHsNkNM0kny Ox5XZDe0JSM6vVxILOeWJv02MyxmAxzmgS7LABEBAAG0MEZvcnRlIFRlY2huaWNh bCBTdXBwb3J0IDx0ZWNoc3VwLWxpc3RAZm9ydGUubmV0PokBOQQTAQgAIwUCV4Um bwIbAwcLCQgHAwIBBhUIAgkKCwQWAgMBAh4BAheAAAoJEK9WtPCosmjyuwQIAJej 9pmJ9NqL8jeP80KQ9OMSn4jgncB/WWLRIlO8MfjQRAKfiaJ2XGWkD6Coez/Fqpur HnIjcvIy+lHmExCccsKAqxT4E2y83682M5z3YeCEJItlX9P/T9n7VonPou3pzlsL 6+XzRrAX+fBny+l3TOtnacFu++X+lIfrVpbM/pwPAVs1ghlzSuxcX0YlJxRLaCxs 4MewbBMbc8vJZw0lEDl+7zbUDBJK26wy3C4KwJPGz353uY3xauJMMeQs6NiKQ0E6 9uty9IvP0Qn1kVH7Uw02Frs3tVzqdcADkV4ULOUtd/fKak0YC88xEclAzigl8u5j Av6zGxctOQ1An9Yn/e+5AQ0EV4UmbwEIAJr7N966/Hg9HBQOHdP4T9Gh2etXs+u3 Mqt7On6Kqw39afdchjAfUiRXy6HGVx53q8+Th1wwiJvwf4ASmPMQZwfOIOe9cSA9 mi9l1k8m5/u1RGT3WUO/PXi9rW77XGOfADzM9E001D/nh1L9pt9pwOX/O5TBSpOc PByCLFYPMiRH7Fg4gothPP8iKMgVcXVAUYl7HpEfupcuWYPVmLVp/xJ7yrirAqnG 69+yzjkYLEeKA/KHBHBnEmpf5XlPVEUFjF8Sw9QbkNkkY8WJdgHc7NwPg8hqMuUn E9VhpyDIef1+diLMHvXwir2jG2y+nIpLuzYLC2B6g4nN8YUAf52iZtkAEQEAAYkB HwQYAQgACQUCV4UmbwIbDAAKCRCvVrTwqLJo8gCJCACE2uTr3NY4J8UeTHt70qgd bpsvzTDeGZRAMkNP85DrdUdyVsohDbxGdGoxayKrl0HOK/ivveEUcmpJnn15p+Gj fRz+tBT9TRpo2Dw3l9VrUUfYRzf7TUaqXfH+4yrxVuKoNc4YlKg8eNVR00LzFJ7r KUPhw9CZQL5ayj0G0C5CFCOBWTRC1nVdbl1zqOaDRWla3gieXISqUlNpktsfjF26 PkcmF9/Yq3bqs/1oksNh0PCStjDE03f2SXvx6VkKjF0+BhWqrbwo5OldsEWtIiPz GqEoDhZv53bQK+Jam5iiVb8RTVHL0MOdsWyVHFE/9geuYL3lJadUXE8HprUEhlDr
=2pt3

-----END PGP PUBLIC KEY BLOCK-----
Note: When copying the CSG Forte PGP Public Key, ensure to copy the complete public-key block, including both boundary lines and do not at quotation marks, bullets, HTML formatting, or other special characters to the key block.
-----BEGIN PGP PUBLIC KEY BLOCK-----
[complete key content]
-----END PGP PUBLIC KEY BLOCK-----
In case other type of data need to be transferred or there are any other questions related to the CSG Forte PGP Public Key to be used, contact CSG Forte Customer Services at customerservice@forte.net or call to 866 290 54 option 1.
4. How to generate a PGP key pair using GPG4WIN? |
|
|
Follow the steps below to generate PGP keys (Private and Public Keys) using the Gpg4win tool. It is possible to use any key generator tool to create, decrypt, and encrypt messages; however, the GPG4Win application is free and easy to use and install. In case of having issues while installing the latest version of Gpg4win, it is recommended to try with an older version.
Note: PGP key management, including encryption and decryption operations are also possible through a command prompt outside of the Kleopatra program (installed by Gpg4win tool). Syntax for the GPG command is available at the GPG Operational Commands website. However, this is intended for users who are familiar with GPG command syntax.
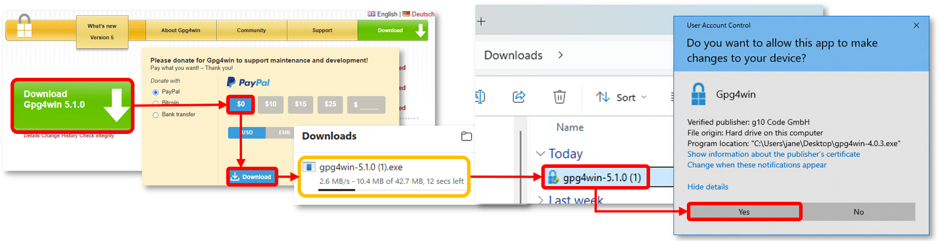
Download | a) Navigate to the Gpg4win download site and select the latest version of the application. If no donation is desired, choose “$0” in the contribution field and click “Download”. b) Once the download is complete, locate the installer and double click it. When the “User Account Control” window appears, click “Yes” button.
|
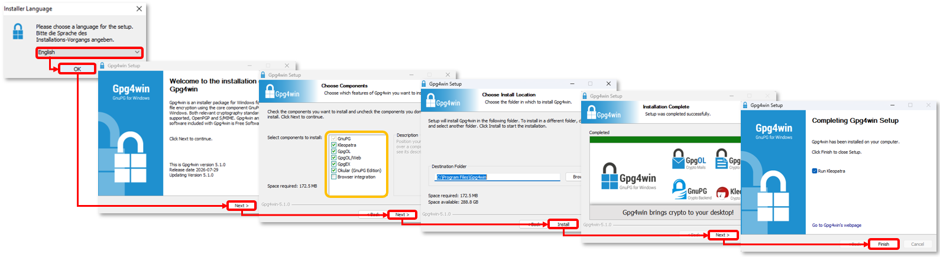
Installation | a) Use the dropdown to select the preferred language and click “OK”. Then, click “Next” on the “Welcome to the installation of Gpg4win” screen. b) On the “Choose Components” screen, confirm that Kleopatra, GpgOL and GpgEX are selected, then select “Next” button. Additional optional components may vary depending on the Gpg4win version being installed. c) Use the “Browse…” option in the “Choose Install Location” screen to select the destination folder or keep the default location if no changes are required. Then click “Install”. d) Once the installation is complete, click “Next” on the “Installation Complete” screen. e) Ensure that the “Run Kleopatra” checkbox is selected and then select “Finish”.
|
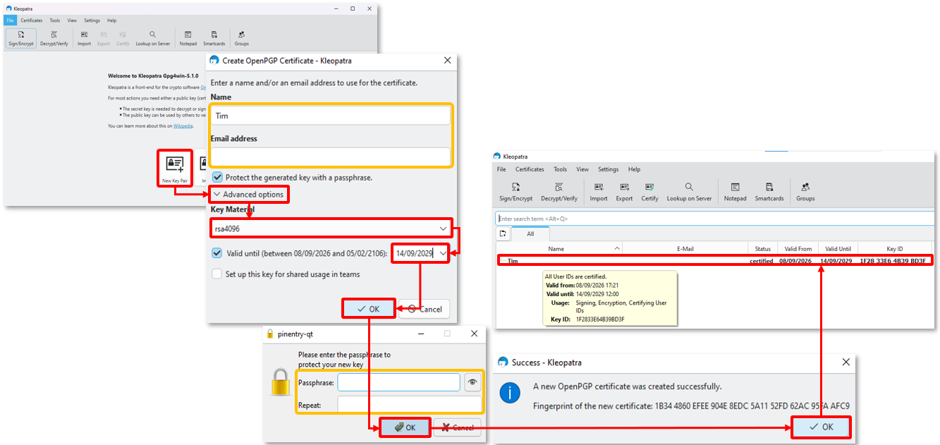
Generate the PGP key pair | a) Once the application is installed, open Kleopatra and select the “New Key Pair” option. b) In the displayed window, enter a “Name” and “Email Address” to identify the PGP key pair being created. Ensure that the “Protect the generated key with a passphrase” option is selected. The “Email Address” field is optional. c) Expand “Advanced Options” and select “rsa 4096” from dropdown list to select the key size. Then define the desired validity period for the PGP key pair and click “OK”. d) In the displayed window, enter a password in the “Passphrase” field, reenter it in the “Repeat” field and then click “OK”. A passphrase is a confidential password used to protect the private PGP key pair. It should contain a combination of letters and numbers and be easy to remember, as users may need to enter it frequently. It is also used to decrypt encrypted information. e) When the confirmation message appears, click “OK” to confirm that the PGP key pair was created successfully. f) Kleopatra then returns to the main window, where the newly created PGP key pair appears in the certificate list. The entry displays the assigned Name, Status, Valid From, Valid Until, and the corresponding Key ID.
|
5. How are the Private and Public keys exported in Kleopatra? |
|
|
After a PGP key pair has been created in Kleopatra, the associated PGP Private Key and PGP Public Key can be exported by:
Obtaining the PGP Public Key |
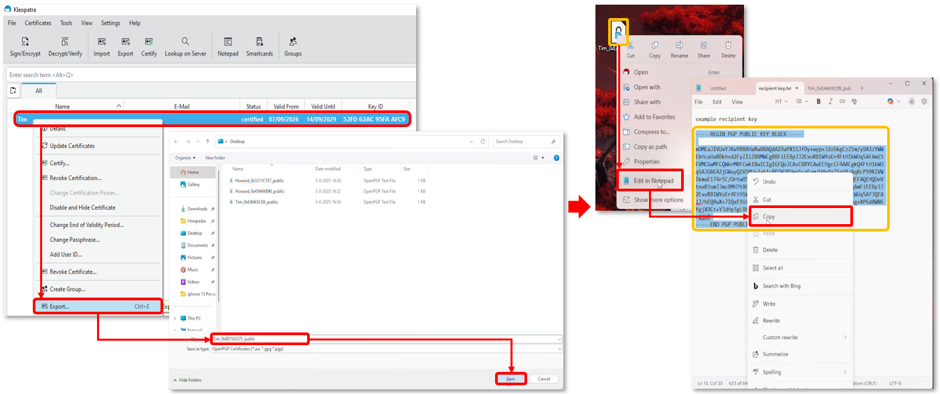
a) In Kleopatra, right-click the newly created PGP key pair and select “Export…” option. b) Select a storage location, assign a file name, and save the file. c) Locate and open the exported file in a text editor to verify that the PGP Public Key is displayed. Note: If the file is not visible in “File Explorer”, select “All Files” from the file-type dropdown list. d) When applicable, provide the PGP Public Key to the sender by copying and sharing the entire key block, from the first dash (-) in the BEGIN PGP PUBLIC KEY BLOCK line through the last dash (-) in the END PGP PUBLIC KEY BLOCK line.
|
Obtaining the PGP Private Key |
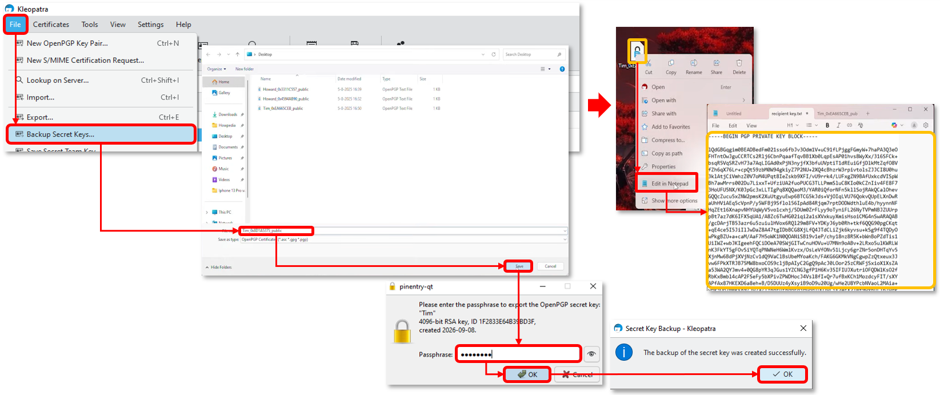
a) In Kleopatra, select the newly created PGP key pair and, from the “File” menu, select "Backup Secret Keys...". b) Select a storage location, enter a file name, and save the file. c) When prompted, enter the “Passphrase” created previously and click "OK". d) Confirm the pop-up message by clicking "OK". e) Locate and open the exported file in a text editor to verify that the PGP Private Key is displayed.
|
6. How to import a public key in Kleopatra? |
|
|
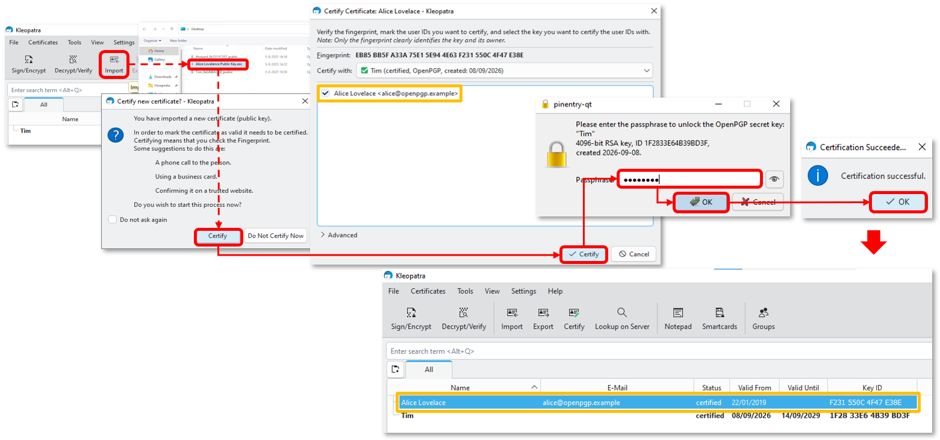
To import a PGP Public Key or Private Key into Kleopatra, first ensure that the customer, third party, or service provider has shared the key through an approved channel, such as email, a public website, or a key repository. After obtaining the key, copy the complete Public Key block, paste it into a text file, and save the file with a “.txt” extension on the computer where the key will be imported. Then complete the following steps:
a) In Kleopatra, select “Import” and browse to the PGP Public Key file.
b) When the certificate details screen appears, click “Certify”.
c) In the certification screen, verify the imported PGP Public Key is displayed correctly, then click “Certify” again.
d) Enter the previously created “Passphrase” and click “OK”.
e) Complete the certification process by confirming the “Certification Successful” message and clicking “OK”.
f) After the import is completed successfully, Kleopatra displays the PGP Public Key in the certificate list.
Note: When copying a PGP Public Key, ensure that the entire Public Key block provided by the sender is included, including the BEGIN PGP PUBLIC KEY BLOCK and END PGP PUBLIC KEY BLOCK boundary lines.
7. How to encrypt information in Kleopatra? |
|
|
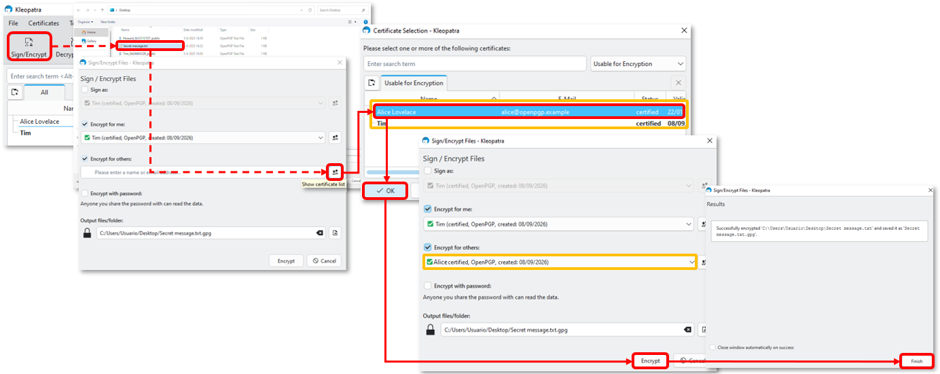
a) Select “Sign/Encrypt” tab and browse to the file to be encrypted.
b) When the “Sign/Encrypt Files” screen appears, click the “Show Certificate List” icon.
c) In the “Certificate Selection” screen, choose the appropriate PGP Public Key and click “OK”. Note: Users can select either an imported PGP Public Key from a customer, third party, or service provider who will receive the encrypted information, or a personal PGP Public Key generated in Kleopatra. If an external PGP Public Key is used, only the recipient can decrypt the file.
d) After returning to the “Sign/Encrypt” screen, verify that the selected PGP Public Key is displayed, then click “Encrypt”.
e) When the “Successfully encrypted” message appears, click “Finish” to complete the encryption process. Kleopatra saves the encrypted file in the same location as the original file.
8. How to decrypt information in Kleopatra? |
|
|
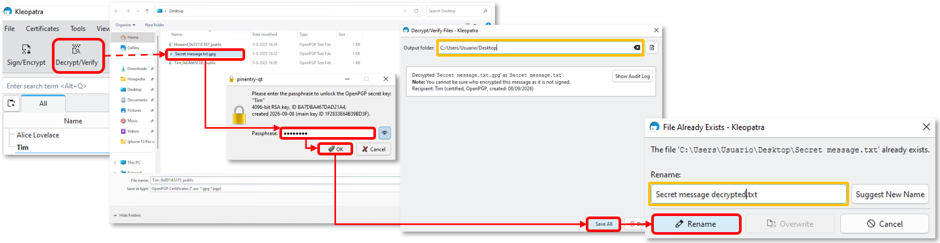
a) Select “Decrypt/Verify” and browse to the file to be decrypted.
b) Enter the applicable “Passphrase” and click “OK”.
c) In the “Decrypt/Verify Files” screen, verify the destination folder where the decrypted file will be saved, then click “Save All”.
d) If necessary, enter a new file name and click “Rename” to complete the decryption process. Kleopatra saves the decrypted file in the selected folder.
Was this article helpful?
That’s Great!
Thank you for your feedback
Sorry! We couldn't be helpful
Thank you for your feedback
Feedback sent
We appreciate your effort and will try to fix the article