The V400C Plus is a countertop, integrated payment terminal designed to support secure, high‑performance card‑present transactions. It supports multiple deployment modes (standalone, semi-hybrid, native-hybrid and cloud mode), advanced encryption standards, and flexible integration options, making it suitable for both standalone and POS‑integrated environments.
Device Overview |
|
|
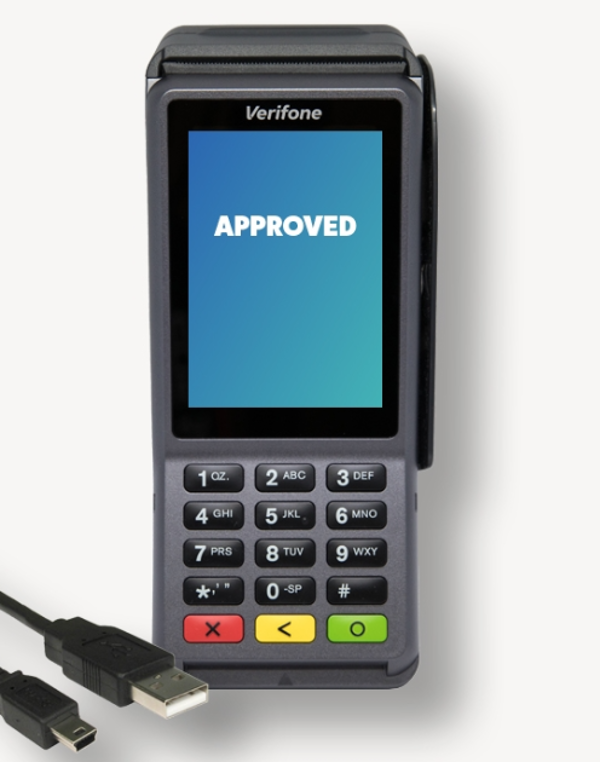
The V400C Plus is a device intended for indoor, attended environments and is designed to meet modern payment security and usability requirements.
| Performance and Technical Specifications | Processor: 600 MHz, Arm Cortex-A9 32-bit RISC Memory: 512 MB Flash, 512 MB SDRAM, microSD Display: 3.5” (320 × 480) HVGA capacitive color touchscreen; oleophobic, smudge-resistant coating Operating System: Linux, with Verifone security enhancements Connectivity: Dial-up, Ethernet, 5 GHz + 2.4 GHz Wi-Fi, Bluetooth 4.2 BLE Printer: 30 lps, 40 mm paper roll Card Readers: Triple track MSR: ISO 7810, 7811, 7813; smart card reader, 2 SAM slots Contactless: ISO 14443 Types A and B, ISO 18092- capable, MIFARE, NFC/ CTLS schemes Peripheral Ports: 2 USB connectors: 1 host, 1 host/client; 1 powered RS-232 Keypad: 10 + 5 buttons, backlit, privacy shield Audio: Speaker + Multi-tone buzzer Security: PCI PTS 5.X-approved; capable of supporting AES DUKPT Power: AC input 100-240 VAC, 50/60 Hz; DC output 11.6 V 1.55 A Environmental: Operating temperature: 32° to 122° F Storage temperature: -4° to 140° F Physical: 190 mm L × 80 mm W × 70 mm H; 381 g |
| Security Features | PCI-Approved for Secure Transaction: V400C Plus are PCI PTS POI v5.x approved EMV L1 Type Approval: Both contact and contactless transactions Tamper-Resistant Construction: TLS protocols and VeriShield authentication VeriShield: Protect encryption for security. |
| Selecting a Secure Location | Convenience: Choose a location that is accessible for both the merchant and the cardholder. Flat Surface: Place the device on a stable surface like a countertop or table. Proximity to Power and Network: Ensure the location is near a power outlet and network line. Walkways Safety: Avoid placing the power cord in walkways or where it can be a tripping hazard. Attended Environment: Use the terminal in a supervised area to prevent unauthorized access. Avoid Extreme Conditions: Do not use the terminal in areas with high heat, dust, humidity, moisture, or where caustic chemicals or oils are present. Protection from Sunlight and Heat: Keep the terminal away from direct sunlight and heat sources like stoves or motors. Indoor Use Only: The terminal is not waterproof or dustproof and is intended for indoor use only. Exposure to rain or dust may avoid the warranty. |
Supported Payment Methods |
The V400C Plus supports a comprehensive range of card present and card not present payment methods, subject to merchant configuration, processor enablement, and applicable risk controls. Supported payment methods include:
- EMV chip (contact) transactions, providing enhanced security through dynamic data authentication.
- Contactless (NFC / CTLS) payments, including supported mobile wallets such as Apple Pay, Google Pay, and Samsung Pay, enabling fast, tap to pay experiences.
- Magnetic stripe (MSR) transactions, supported for fallback or legacy use cases in accordance with card brand rules.
- Manual / keyed entry, available only when explicitly enabled and subject to additional risk controls and validation requirements.
The V400 Plus supports major card brands, including Visa, Mastercard, American Express, and Discover, as configured at the merchant and processor level. Availability of specific payment methods and card brands may vary based on merchant setup, industry requirements, and compliance restrictions.
Note: Contactless/mobile wallet functionality and any related P2PE configuration are available only when Vantiv (Worldpay) is the processor.
Operating Modes |
|
|
The V400C Plus supports multiple operating modes to accommodate different merchant environments, integration requirements, and deployment models. The selected operating mode determines how transactions are initiated, how the terminal communicates with external systems, and how configuration and management are performed.
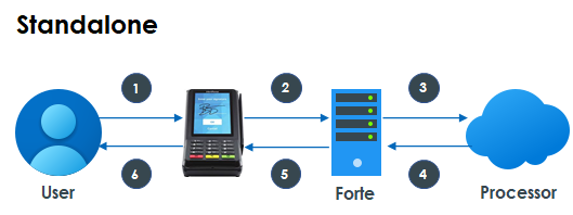
•Standalone Mode: all transaction details are entered directly on the V400C Plus. The terminal independently manages transaction flow, card capture, authorization, and receipt printing without reliance on an external POS or host system. This mode is typically used in simple countertop environments or low‑integration use cases.
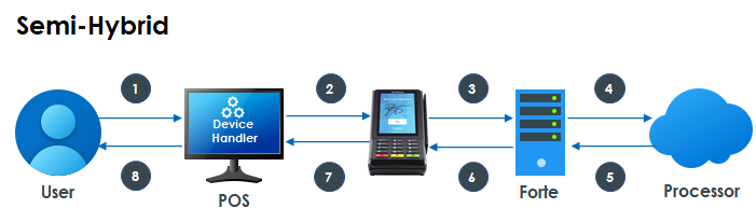
•Semi Hybrid Mode: transactions are initiated from a web based POS or payment application. Transaction details are transmitted to the V400C through a CSG Forte-provided Windows based device connectivity component (sometimes referred to as the Forte Payments Device Handler), while card interaction and encryption occur on the terminal.
The terminal then transmits the authorization request to CSG Forte and receives the corresponding authorization response. Upon receiving the response, the terminal generates and prints an EMV‑compliant receipt (where applicable) and returns the authorization result to the originating POS or calling application to complete the transaction workflow.
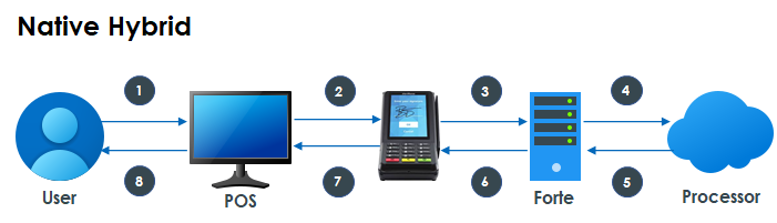
•Native Hybrid Mode: This integration model enables merchants developing Windows-based POS applications to connect to the V400C Plus through CSG Forte’s Device Handler DLL or via custom integrations. Under this approach, the POS application governs the transaction logic, while the terminal is responsible for card capture, encryption, secure transmission, and submission of the authorization request to CSG Forte.
The terminal then receives the authorization response, prints an EMV-compliant receipt, and returns the authorization result to the calling application. Developers using non-Windows platforms or alternative frameworks must implement custom integrations and include the required request parameters as defined in the CSG Forte Device Handler Integration information.
•Cloud Mode: the transactions are initiated through a web-based POS or payment application, which transmits the transaction details to the V400C Plus over a cloud-based WebSocket connection. Within this model, the terminal is responsible for cardholder interaction, card data capture, and encryption. Note: For terminals to operate in Cloud mode, they must be provisioned in Dex under the appropriate Location and explicitly enabled for Cloud mode.
Payment Operations |
|
|
Payment operations on the V400C Plus vary based on the selected operating mode but follow a consistent, secure transaction flow. This section outlines how transactions are initiated, processed, and completed, as well as how receipts are handled.
Transaction Flow Overview
- The transaction is initiated either directly on the terminal (Standalone mode) or from an integrated POS or payment application (Semi Hybrid, Native Hybrid, or Cloud modes).
- The transaction amount is displayed on the V400C Plus for customer confirmation.
- The customer is prompted to present a payment method (chip, tap, swipe, or manual entry, as enabled).
- Card data is securely captured and encrypted by the terminal.
- The authorization request is transmitted to the processor, and a response is returned to the terminal and/or POS system.
Receipt Handling
- Receipts may be printed directly on the terminal or managed by the POS system, depending on configuration and operating mode.
- Receipt content and delivery method are determined by merchant setup and applicable compliance requirements. .
Installation and Connectivity |
|
|
The V400C Plus supports multiple connectivity options to accommodate different deployment environments. Selecting the appropriate connectivity method is critical to ensure transaction reliability, performance, and compliance.
Connectivity Selection Guidance
- Ethernet (Preferred) is supported and is the preferred method for production environments, requiring validated network access prior to power‑on and outbound firewall communication over ports 80 and 443 to CSG Forte systems;(Dynamic Host Configuration Protocol (DHCP) is supported, and static IP configuration may be used when required by merchant network policies.
- Wi‑Fi is supported on 2.4 GHz and 5 GHz networks and requires available credentials, sufficient signal strength, and network stability to ensure consistent transaction performance; use of Wi‑Fi in production environments may be subject to additional approval. Power and communication cables must be securely connected prior to applying power, and cable routing must minimize strain, accidental disconnection, and exposure to damage.
Payment Processing Connectivity Requirements
For payment processing, the V400C Plus supports multiple configuration options to communicate with CSG Forte gateway services. These configurations must be validated within the merchant network environment to ensure proper routing and firewall access:
- Primary Endpoint (Live and Sandbox): Payment processing to www.paymentsgateway.net over port 443
- Alternative Endpoint (Live Environment): Payment processing to www.paymentsgateway.net over port 5050
- Alternative Endpoint (Sandbox Environment): Payment processing to www.paymentsgateway.net over port 6050
These options provide flexibility in network configuration and should be selected based on merchant infrastructure and environment requirements.
VHQ Terminal Management Connectivity
For terminal provisioning, monitoring, and lifecycle management, the V400C Plus communicates with Verifone HQ (VHQ) services using the following configuration:
- Service URL: https://vhq.verifone.com/MessagingServer/MessageHander.asmx
- IP Addresses: Primary: 199.71.107.160 &Secondary: 199.71.106.30
- Port: All communications occur over port 443
Network access to these endpoints must be allowed to ensure successful remote management, updates, and configuration synchronization.
Installation Details
- Power: Use only approved external Alternating Current (AC) power supplies that meet device voltage and current specifications.
- PC / ECR: Connections are supported via the multi‑communication port using appropriate adapters. Some peripherals may require an independent power source.
Terminal Configuration |
|
|
Terminal configuration ensures the V400C Plus operates correctly based on the selected operating mode, connectivity method, and security requirements. Configuration steps may vary depending on whether the device is deployed in standalone, semi-hybrid, hybrid, or cloud mode.
Configuration Overview and Dependencies
- Configuration must be completed after installation and network connectivity are confirmed.
- Certain settings are mode dependent and may be managed locally on the device or centrally through Verifone’s management tool (VHQ), depending on your deployment.
- Security related configurations must follow CSG Forte and PCI compliance standards .
Core Configuration Settings |
|
|
- Date and Time Configuration: For accurate transaction processing, reporting, and system synchronization, the date and time settings on the V400C Plus Plus payment terminal must be correctly configured. Incorrect date or time settings may result in transaction errors, reporting discrepancies, or connectivity issues. This procedure outlines the approved steps for updating the date and time on the device.
Procedure: Setting the Date and Time | |
Access Administrative Mode | • Press and hold the 1, 5, and 9 keys simultaneously. • Continue holding the keys until the Admin Menu is displayed. |
Open the Control Panel | • Scroll through the available menu options. • Select Control Panel. |
Enter System Mode | • From the Control Panel menu, scroll and select Sysmode. |
Log In as Supervisor | • Select Supervisor from the available options. • When prompted, enter the Supervisor password. • If the Supervisor password is not known, assistance must be requested from Technical Support. |
Navigate to Date and Time Settings | • From the Supervisor menu, select Administration. • Select Date/Time to access the configuration screen |
Update the Time | • Tap the currently displayed time. • When prompted, enter the correct values in the following order:
• Ensure that the entered values accurately reflect the local time. |
Date, Time Zone, and 24/48-Hour Reboot | To configure the system date, time zone, and scheduled reboot settings, the following steps shall be performed:
|
Exit and Reboot the Terminal | • Press the red X key twice to return to the previous menu. • Select Exit, then choose Reboot. • Allow the terminal to restart fully to apply the updated date and time settings. |
- Cloud management (if enabled): In Cloud mode, devices can be remotely managed through Verifone’s management tool (VHQ) . Setup typically includes registering the device in Dex and VHQ and applying a cloud configuration profile. If Cloud mode is part of your deployment, CSG Forte Support will provide the required steps and access for your account. Cloud setup generally includes: (1) registering the terminal, (2) assigning a cloud configuration profile, and (3) completing required software/parameter updates. The exact steps and any required identifiers (for example, device keys) vary by account; follow the instructions provided by CSG Forte Support for your deployment. Important: Each V400C Plus terminal requires a unique cloud template, as the Device Key is unique per device. Cloud templates must not be reused across terminals.
Step A: Enable Cloud Services and Register the Terminal in Dex
| Sign in to Dex using the credentials provided for your account. 1.Navigate to the appropriate “Location” associated with the merchant.2.Expand the “Terminals” section. 3.Enable “Cloud Services” by switching the “Cloud Services” toggle to ON. 4.Select “Manage” to open the terminal management interface. 5.Add and Register the Terminal 6.Select “Add Terminal” and complete the following fields: • “Terminal Model”: V400C PLus • “Serial Number”: Enter the device serial number • “Configuration Type”: Cloud Enabled • “Device Status”: Active • “Location ID”: Select the appropriate Location ID 7.Select “Apply”, then select “Add Terminal” to complete registration. 8.Copy the system generated “Device Key”. • This “Device Key” is required for template configuration in Verifone HQ/VHQ and must be retained. |
Step B: Configure the Cloud Template in Verifone HQ/VHQ
| 1.In VHQ, create a new template by copying a known working “Cloud template”: • Use a CSG Forte-provided cloud configuration profile that matches your encryption model (for example, P2PE vs. non P2PE). • If the appropriate profile is unclear, CSG Forte Support before proceeding. 2.Rename the new template using the following naming convention: • Name the profile so it is uniquely associated with a single terminal (your Support contact can provide the required naming convention, if applicable). • Example: V400C Plus Cloud [terminal identifier] • This ensures the template is uniquely associated with a single terminal. 3.Update the template parameters: • Verify and update merchant information • Ensure the Device Key matches the value generated in Dex • Confirm the correct MID is assigned under Cloud Settings 4.Assign the newly created “Cloud template” to the registered terminal, by selecting it and moving it to the column on the right. 5.Schedule required updates: Schedule both a Software Update and a Parameters Update, based on merchant requirements or new equipment provisioning. 6.Merchant Activation, after the update is delivered, the merchant must: • Press the green Enter key on the terminal to initiate installation • Upon successful completion, the Cloud Application will install and the terminal will return to the Welcome Screen |
Step C: Transition from Semi‑Hybrid Configuration (If Applicable) | If the merchant is migrating from a Semi‑Hybrid deployment – defined as a cabled connection utilizing with CSG Forte Payment Device Handler installed on a Windows workstation - the existing configuration must be fully removed.
|
Step D: Completion and Validation | Once all steps have been completed successfully: • Cloud Services will be fully enabled on the terminal. • The device will load the Cloud Application. • “Hit Enter Key to Process” will be displayed on the terminal screen. Pressing the Green(o) button on the terminal, will display the Welcome Screen indicating readiness for use. |
- Manual USB Procedure for Connectivity Issues: provides instructions for performing manual software and configuration update on Verifone V400C Plus terminals that are unable to connect to the Verifone HQ/VHQ system. The update is completed using a USB drive and consists of two required components:
- Installation of the ADK software package
- Installation of the Verifone HQ/VHQ configuration file Carefully follow all steps to ensure a successful update.
Prerequisites and Important Notes | • The terminal must be powered on throughout the process. • A USB drive is required. • The USB drive must be small enough to fit into the USB port located on the bottom of the terminal. • Both update files must be copied to the root directory of the USB drive before beginning. |
Step 1: Prepare the Update Files | Download the following files: • ADK File: dl.adk-4.7.23.4-1606-vos2-engage-prod.tgz (Download from dl.adk- 4.7.23.4-1606-vos2-engage-prod.tgz) • Verifone HQ/VHQ Configuration File Forte-vhq.verifone.com-3.2.6_Config_Engage_noema.tgz (Forte-vhq.verifone.com-3.2.6_Config_Engage_noema.tgz) Copy both files to the USB drive. |
Step 2: Install the ADK File | 1.Insert the USB drive into the USB port located on the bottom of the terminal. 2.Enter Admin Mode: oPress 1 + 5 + 9 simultaneously until the menu appears. 3.Navigate through the menus: • Select Control Panel • Select Sysmode • Select Supervisor 4.Enter the Supervisor password. • If the password is unavailable, contact CSG Forte Support 5.From the Supervisor menu: • Select Update • Select USB Memory • Choose the file: dl.adk-4.7.23.4-1606-vos2-engage-prod.tgz 6.When prompted: • Select OK to confirm • Select OK to start the installation Installation Notes • A progress bar will appear. • The terminal will reboot multiple times during installation. • Approximate installation duration: 5 minutes. • Upon completion, the terminal will return to the main screen. |
Step 3: Install the Verifone HQ/VHQ Configuration File | 1.Re enter Admin Mode: • Press 1 + 5 + 9 2.Navigate to: • Control Panel • Sysmode oSupervisor 3.Enter the Supervisor password. 4.From the Supervisor menu: • Select Update • Select USB Memory • Choose the file: Forte-vhq.verifone.com-3.2.6_Config_Engage_noema.tgz 5.When prompted: • Select OK to confirm • Select OK to start the installation 6.The terminal will automatically reboot once the update completes. |
Step 4: Finalize the Update | 1.Remove the USB drive from the terminal. 2.Allow the terminal to automatically attempt reconnection to Verifone HQ/VHQ. 3.To complete the process, contact CSG Forte Support to notify them that the terminal is ready for validation and final updates. 4.Once all steps are completed and verified by Technical Support, the terminal will be fully updated and successfully reconnected to Verifone HQ/VHQ CSG Forte Support: 866‑290‑5400 (Option 5) |
- P2PE Configuration: When Point to Point Encryption (P2PE) is used, it must be enabled and validated using CSG Forte approved methods for your account. Do not change P2PE settings unless directed by CSG Forte Support, as incorrect settings can cause transaction failures and compliance issues.
P2PE Policies and procedures |
|
|
This section provides an authoritative reference for the use and management of CSG Forte’s PCI-validated Point-to-Point Encryption (P2PE) solution, Forte Protect, for supported Verifone V400C Plus deployments. It is intended to support partners, merchants, and applicable support teams throughout the P2PE lifecycle, including terminal ordering, configuration, deployment, activation, compliance maintenance, monitoring, incident response, return, and decommissioning.
Forte Protect combines approved payment devices, applications, operational processes, and security controls to protect payment card data from the point of interaction through secure transmission for processing. Payment card data is encrypted immediately when it is captured by the approved payment device and remains protected during transmission until it reaches the authorized decryption environment.
Depending on the capabilities and approved configuration of the device, payment information may be captured through magnetic-stripe swipe, EMV chip insertion, or contactless tap. The applicable device, encryption configuration, deployment process, and operational controls must remain consistent with the validated Forte Protect implementation.
The primary objective of this guidance is to ensure that all P2PE-related activities are performed securely, consistently, and in strict alignment with applicable PCI P2PE requirements and approved CSG Forte procedures. Adherence to the documented policies and procedures helps:
- Protect payment card data during transmission.
- Reduce the risk of unauthorized exposure of cardholder data.
- Maintain the integrity of the validated P2PE environment.
- Support consistent terminal deployment, tracking, inspection, and lifecycle management.
- Maintain compliance with applicable PCI P2PE requirements.
- Ensure that security incidents, device returns, and terminal decommissioning activities are managed through approved processes.
Only approved devices, applications, configurations, and operational procedures may be used within the Forte Protect environment. P2PE settings must not be modified unless directed by CSG Forte Support, as unauthorized changes may affect transaction processing, security controls, or the validated P2PE implementatio .
For full step by step instructions , detailed operational procedures and any procedure of Return Material Authorization (RMA), refer to the official P2PE Support Guide and Set Up V400C Plus – CSG Forte.
Note: End-to-End Encryption (E2EE) is a general data-protection concept and should not be interpreted as equivalent to PCI-validated Point-to-Point Encryption (P2PE). P2PE is a specific payment-security framework governed by PCI requirements and approved implementation controls.
Returns and Decommissioning |
|
|
Terminals requiring return, replacement, or decommissioning must follow approved Return Material Authorization (RMA) and equipment return procedures. Devices must not be disassembled. P2PE enabled terminals must be returned and tracked in accordance with PCI and CSG Forte security requirements.
Supplemental technical documentation, integration guidance, and updates related to the V400C Plus are also available through:
- CSG Forte Developer Portal: V400C Plus – CSG Forte
- POS onboarding resource: Payment Equipment | Certified Devices for CSG Payments Solutions
- Equipment store: https://equipment.forte.net/
Ordering Payment Devices And Accessories |
|
|
This section outlines the standardized process for ordering supported payment devices and related accessories through the CSG Forte Equipment Portal. The ordering workflow is consistent across devices, with product selection varying by device category. This approach ensures accurate fulfillment, proper configuration, and alignment with merchant deployment requirements.
All supported devices are ordered through the CSG Forte Equipment Portal: Portal: http://equipment.forte.net
Navigation paths by device type:
•Verifone V400C Plus : “Equipment” > “EMV Terminals”
Available purchase options include:
•Terminal only
•Terminal with optional accessories (for example, cables and receipt paper)
Standard Ordering Workflow
The ordering workflow is generally consistent across supported devices:
- Access the CSG Forte Equipment Portal.
- Navigate to the applicable device category.
- Select the required device model and any accessories.
- Add the selected items to the shopping cart.
- Review shipping options and estimated charges using the available shipping calculator, when provided.
- Complete checkout by entering the required billing, shipping, payment, and merchant information.
This approach is intended to support accurate ordering, appropriate device fulfillment, and correct configuration alignment.
Required Information To Place An Order
To complete an order, the following information must be provided:
Billing Information | • Contact first and last name • Merchant legal name • Billing address (street, city, state, postal code, country) • Phone number • Email address |
Shipping Information | • Ship‑to address (billing address or alternate location) • Selected shipping option, if applicable • Payment Information • Credit card payment, or • Invoice billing option (when permitted under the merchant’s agreement with CSG Forte) |
Merchant Details | • Merchant ID (required for invoicing and account tracking) • List of Merchant IDs to be configured on the device (when applicable) Order comments or special instructions (optional) |
Shipping, Fulfillment, And Special Instructions
- Shipping speed should be selected based on operational timelines and deployment needs.
- The order notes or special instructions field should be used to document delivery constraints (for example, receiving hours, building access requirements, or labeling instructions).
Post Order Considerations
- After delivery, device setup and configuration must be completed in accordance with this guide and applicable device specific procedures.
- Certain deployments may require additional steps such as device registration (for example, Wedget keyboard use for eDynamo), testing, or post provisioning validation.
Fees, Pricing, And Support
- Some configurations may incur additional fees, such as annual encryption or device management fees, as defined in current CSG Forte pricing and contractual terms.
- Questions related to pricing, availability, order status, or fulfillment should be directed to CSG Forte Sales or CSG Forte Support through the published support channels or support portal
Support and Contact Information |
|
|
CSG Forte | Technical Support | EquipmentQuestions@forte.net |
Additional Links |
|
|
- Forte V400C Video overview
- V400C – CSG Forte
- Set Up V400C Plus – CSG Forte
- Point-to-Point Encryption - P2PE Instruction Manual (PIM)
- V400c Plus User Manual Desktop
Was this article helpful?
That’s Great!
Thank you for your feedback
Sorry! We couldn't be helpful
Thank you for your feedback
Feedback sent
We appreciate your effort and will try to fix the article